3rd Party Event Tracing Calls in Apigee

on Monday, February 10, 2020

Apigee has information on their website which makes event tracing of calls to a 3rd party system relatively easy. But, the information is spread out over a couple of pages. To provide this functionality effectively, you’ll want to use two different features together:

  • Use a PostClientFlow to ensure the event logging is performed after the response is sent to the client.
    &nsbp;
  • Use a ServiceCallout Policy, with the <Response /> element removed. This will ensure the call to the 3rd party system is done as a Fire-and-Forget call, rather than one that waits for a response before continuing processing.

    There is a MessageLogging Policy, which is specifically designed for this logging scenario. However, the MessageLogging policy doesn’t allow for Header information to be added into the call; and there are a number of 3rd party logging systems (like Splunk) which use the Authentication header to verify the incoming caller.

The end result of making these changes looks a little like this:

The 5 steps within the workflow taht are grouped by a red box show a group of 2 service calls which are each logging to separate 3rd party systems (we wanted to compare the two products to see which would fit our needs better). In the top left red box is the complete processing time within Apigee, 78 ms. And the small red box at the bottom right (in Postman) is the amount time from the client’s perspective, just 46 ms.

To do this, you’ll want to setup a shared flow that will make the ServiceCallout's. Remember that each ServiceCallout should remove it’s <Response> element:

Once that’s in place, you’ll just need use the shared flow as part of a <PostClientFlow> within you API’s. I wish this was an element I could use within the Post-proxy Flow Hook; that way I could add it to all APIs in one place.

Apigee–Throughput, Response Time and Error Rate

on Monday, December 31, 2018

I was listening to Lynda.com’s training course DevOps Foundations: Monitoring and Observability with Ernest Mueller and Peco Karayanev. I thought I heard Mr. Mueller say that Google had a a trinity of metrics which they always cover when developing Web APIs: Throughput, Response Time, and Error Rate. He stressed that it’s important to look at all of these indicators on the same dashboard, because they create a more informed view when displayed together. I did a quick search and it didn’t really pop-up on a google site, but what Mueller said was pretty much described on New Relic’s Application Monitoring page.

One thing that made a lot of sense to me was how these three metrics are strong indicators of when a major outage is going to happen. If the response times go up but everything else is the same, then a downstream system (like a database) is probably having an issue. If the throughput drops but the response times don’t then a system earlier in the workflow is probably having an issue. And, a ton of errors is a ton of errors in the web api.

So, I wanted to know how difficult it would be to create a report in Apigee which could visualize all three of these metrics on the same screen.

To do this, I created a Custom Report in the Analyze section of the Edge Admin portal and setup these metrics:

  • Average Transactions per Second

    This should be your throughput. One thing that Mueller and Karayanev said was that you shouldn’t look at averaged metrics in isolation. If you monitor an average for a particular metric, you should also have a Max or Min of the same metric. That way you don’t see misleading information where the average number of transactions look normal, but that is actually hiding spikes in traffic. Unfortunately, there was no pre-built metric for Sum of Transactions per Second.
  • Total Response Time (Average) and Total Response Time (Max)

    Following the guidance from above (don’t look at average metrics in isolation), both of these metrics combine to show a solid view of the real response times.
  • Target Errors (Sum)

    The system also has Proxy Errors and Policy Errors. I chose to go with Target Errors, because they are the errors that should indicate if the actual Web API was having problems.
  • Filter

    I also used a filter at the end to remove two things that could corrupt the data:

    1) The dining-cams proxy is a streaming proxy and never closes it’s connection. So, the average response time is always the maximum value the graph will hold.

    2) In an early post I talked about using a /upcheck endpoint to ensure proxies were up and running. I needed to remove those requests so the data wouldn’t be skewed by synthetic calls.

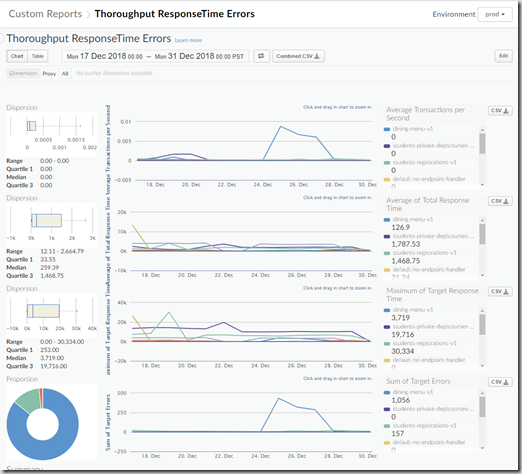
Overall, it looked like this:

image

We have very few users of the system, so there wasn’t much data to actually show. But, it did provide a few pieces of good information:

  • The Registrations endpoint is pretty sluggish.
    • The private endpoints are expected to take a long time (those response times are actually kind of fast)
  • The Dining Menu endpoint could have it’s error logs looked over.

image

image

How much overhead does Apigee add to a request?

on Monday, December 10, 2018

So, I got asked this question earlier today and was surprised that I never memorized an answer.

It’s definitely dependent on your configuration, but for our purposes it looks like it’s about 60 ms. And, it’s probably less than that (see below).

image

The total time states 267ms, but the response actually sends back to the client around the 220ms mark. Of those 220ms, about 162ms is spent making the round trip to the application server to process the request. Below is a more detailed break down. But, you should be aware that many of the 1ms values listed below are actually < 1ms. The total values are probably lower than the values quoted.

image

Adding a /deploycheck to all Apigee API Proxies

on Monday, November 19, 2018

Apigee has a way to perform healthchecks against Target Servers in order to ensure that requests are routed to a healthy application service. But, what about this rare scenario: An API Proxy is being replaced/updated and the new API Proxy never gets deployed to ‘prod’. And, the prod endpoint no longer has an API Proxy handling requests for it.

In the scenario where the API Proxy is accidently not deployed to ‘prod’, the only way to test for the mistake is using an outside tester. And, there are a lot of services out there that can provide a ping or healthcheck to do that:

In all of those scenarios, you will need the API Proxy to respond back that it’s up and running. In this particular scenrio (“The the API Proxy running in prod?”), we don’t need a full healthcheck. All we need is a ping response. So …

Here’s a quick way to add an /upcheck (ping response) endpoint on to every API Proxy using the Pre-Proxy Flow Hook. To do this …

  • Create an /upcheck response shared flow (standard-upcheck-response)
  • Create a standard Pre-Proxy shared flow which you can add and remove other shared flow from.
  • Setup the standard Pre-Proxy shared flow as the Pre-Proxy Flow Hook.

Create the standard-upcheck-response shared flow

Create the standard-preproxy shared flow to plan for future additions to the flow hok

And finally setup the flow hook

image

Apigee CORS Headers During Api Key Failure

on Monday, November 12, 2018

In a previous post, I mentioned sending OPTIONS responses so Swagger UIs can call a webservice without getting an error.

Unfortunately, there’s a second scenario where Swagger UI can conceal an error from being displayed because the error flow doesn’t include CORS headers.

The Problem Scenario

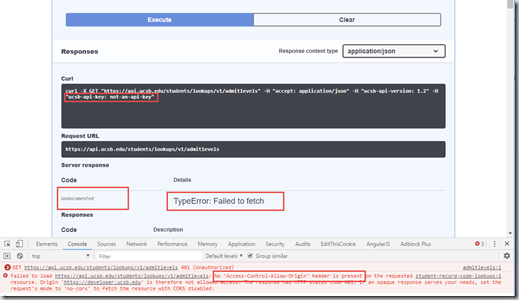
If your API Key doesn’t validate, then an error will be generated by the VerifyApiKey Policy and will return an error message to the Swagger UI browser without any CORS headers attached. This is what it looks like …

You’re in the browser and you ask for the Swagger UI to send a request with a bad API Key and you get back a “TypeError: Failed to fetch” message. And, when you look at the console you see No ‘Access-Control-Allow-Origin’ header is present.

image

When you switch over to the network view, you can see that the initial OPTIONS response came back successfully. But, you actually got a 401 Unauthorized response on your second request.

image

If you look further into the second request, you will find the error response’s headers don’t contain the Access-Control-Allow-Origin header.

image

If you then pull up the Trace tool in Apigee, you can see that the Verify API Key policy threw the error and the request returned before having any CORS headers applied to it.

image

How to Fix This

So, what we need to do is add CORS headers onto the response before it’s sent back. And, to do that we can use the Post-proxy Flow Hook. These are generally reserved to do logging tasks, but we are going to use them to add headers.

image

This Post flow will now add all of the headers on every response. So, the Apigee Trace tools output now looks like this:

image

Which will now send the CORS response headers to the browser:

image

And that will result in the real error message appearing in the Swagger UI Tester:

image

The Shared Flow used in the pictures above is some over done. Here is a much simpler Flow Task modeled after the previous post on the topic. This would be quick and easy to setup:

Apigee Catch All Proxy

on Monday, September 10, 2018

I’ve written before about how Apigee’s security is NOT Default Deny. In a similar thread of thought, I was recently speaking with an Apigee Architect who pointed out that it’s good idea to setup a Catch All Proxy in order to hide default error message information and help prevent search bots from indexing those error messages.

It’s really quick to setup and and can actually help out your end users by having the catch-all proxy redirect them back to your Developer Portal.

To do this:

1. Create a new proxy, + Proxy.

2. Select No Target

image

3. Give it a Proxy Name, and Description, but make the Proxy Base Path is set to /. Apigee’s url matching system is really smart and it will select the best match for each incoming url. This pattern will be the last to match, making it the ‘catch all’.

image

4. Everything about this is going to be very barebones. So, make it Pass through (none).

image
5. Set it up for all your endpoints.

image

6. And then Build it for Dev (or whatever your non-Prod environment is). Don’t worry about the Proxy Name, I needed to remake this picture.

image

7. Once it’s Built and Deployed, navigate over to the Develop tab of the new proxy.

8. In your proxy, you’re going to have only 1 policy and that policy will redirect traffic over to your Developer Portal.
image

9. To set this up, use a RaiseFault Policy and set the fault response to look like this:

image


10. Make sure you added the new DevPortal-Response policy into your PreFlow Proxy Endpoint as shown in Step 8.

11. Open up a browser and give it a spin using your Dev endpoint. Of course, test out some of your other API Proxies to make everything still works as you expect. Once everything looks good, promote it on up the environment stack.

That’s it! It take less than 10 minutes.

Apigee REST Management API with MFA

on Monday, August 20, 2018

Not too long ago Apigee updated their documentation to show that Basic Authentication was going to be deprecated on their Management API. This wasn’t really a big deal and it isn’t very difficult to implement an OAuth 2.0 machine-to-machine (grant_type=password) authentication system. Apigee has documentation on how to use their updated version of curl (ie. acurl) to make the calls. But, if you read through a generic explanation of using OAuth it’s pretty straight forward.

But, what about using MFA One Time Password Token’s (OTP) with OAuth authentication? Apigee supports the usage of Google Authenticator to do OTP tokens when signing in through the portal. And … much to my surprise … they also support the OTP tokens in their Management API OAuth login. They call the parameter, mfa_token.

This will sound crazy, but we wanted to setup MFA on an account that is used by a bot/script. Since the bot is only run from a secure location, and the username/password are already securely stored outside of the bot there is really no reason to add MFA to the account login process. It already meets all the criteria for being securely managed. But, on the other hand, why not see if it’s possible?

The only thing left that needed to be figured out was how to generate the One Time Password used by the mfa_token parameter. And, the internet had already done that! (Thank You James Nelson!) All that was left to do was find the Shared Secret Key that the OTP function needed.

Luckily I work with someone knowledgeable on the subject and they pointed out not only that the OTP algorithm that Google Authenticator uses is available on the internet but that Apigee MFA sign-up screen had the Shared Secret Key available on the page. (Thank You Kevin Wu!)

When setting up Google Authenticator in Apigeee, click on the Unable to Scan Barcode? link

image

Which reveals the OTP Shared Secret:

image

From there, you just need a little Powershell to tie it all together:

Apigee TimeTaken AssignVariable vs JS Policy

on Monday, August 6, 2018

Apigee’s API Gateway is built on top of a Java code base. And, all of the policies built into the system are pre-compiled Java policies. So, the built in policies have pretty good performance since they are only reading in some cached configuration information and executing natively in the runtime.

Unfortunately, these policies come with two big draw backs:

  • In order to do some common tasks (like if x then do y and z) you usually have to use multiple predefined policies chained together. And, those predefined policies are all configured in verbose and cumbersome xml definitions.
  • Also, there’s no way to create predefined policies that cover every possible scenario. So, developers will need a way to do things that the original designers never imagined.

For those reasons, there are Javascript Policies which can do anything that javascript can do.

The big drawback with Javascript policies:

  • The system has to instantiate a Javascript engine, populate its environment information, run the javascript file, and return the results back to the runtime. This takes time.

So, I was curious how much more time does it take to use a Javascript Policy vs an Assign Message Policy for a very simple task.

It turns out the difference in timing is relatively significant but overall unimportant.

The test used in the comparison checks if a query string parameter exists, and if it does then write it to a header parameter. If the header parameter existed in the first place, then don’t do any of this.

Here are the pseudo-statistical results:

  • Average Time Taken (non-scientific measurements, best described as “its about this long”):
    • Javascript Policy: ~330,000 nanoseconds (0.33 milliseconds)
    • Assign Message Policy: ~50,000 nanoseconds (0.05 milliseonds)
  • What you can take away
    • A Javascript Policy is about 650% slower or Javascript has about 280,000 nanoseconds overhead for creation, processing and resolution.
    • Both Policies take less that 0.5 ms. While the slower performance is relatively significant; in the larger scheme of things, they are both fast.

Javascript Policy

Javascript Timing Results

image

Assign Message Policy

Assing Message Timing Results

image

Apigee–API Key from Query String or HTTP Header

on Monday, July 16, 2018

Apigees’ API Proxy samples are a great way to get started, but many usage scenario aren’t available as a sample. A somewhat common scenario is wanting to check for an API Key in multiple places. In this exapmle, the proxy will need to be able to check for a API Key that is present as a query string parameter or an HTTP header. This allows the Gateway to adhere to Postel’s Law by allowing the client to determine what’s the best way to transmit the information to the service.

That’s all a fancy way of saying: Let’s make it easy check if the API Key is passed in as a Header or a Query String.

Unfortunately, with Apigee, it’s not so easy to check both of them. In this example, we’ll use a Javascript Policy to check if the API Key exists in the query string. If it does, the value will be copied into a header variable. After that, a normal Verify API Key Policy will be used to check the header value.

Hopefully, in a future post, I can reimplement this using only Apigee Policies and without using Javascript. There is a performance penalty that comes with using Javascript in Apigee and I would like to see just how severe that penalty can be.

Here is a Shared Flow that will do just the two steps mentioned above:

And, now for the Javascript. Which is a combination of a Policy and a .js file. This one does all the heavy lifting:

Finally, use the standard Verify API Key policy to check the header value:

Switching Apigee Management Endpoint to OAuth

on Monday, June 11, 2018

So, Apigee is updating their REST Management API to no longer accept Basic Authorization headers and instead use OAuth tokens. It’s a good move, as it adds a little more security by issuing tokens that are only valid for 30 minutes. The strength of the security is still provided through HTTPS connections and proper storage of credentials by the users/clients.

To make the update, I’ll be switching out a Basic Authentication setup with an OAuth setup. Apigee decided to go with a password grant, with the optional parameters not used. It’s a bit interesting that they went with a password grant over a client credentials grant. The client credential grant seems a lot more straight forward, and it would fit the scenario that each end user/client can directly use their credentials to create automated tooling.

By using a password grant it would imply that they couldn’t use their Apigee Server as the real OAuth server. Their OAuth server is at https://login.apigee.com, and it must be the endpoint that provides SSO protection for https://apigee.com/edge (the Management Website / Management UI). And, any users within that OAuth server must be provisioned into the REST Management API system (https://api.enterprise.apigee.com) as “Applications”. But that’s all speculation.

However they do it, converting for Basic Authentication to OAuth is pretty straight forward. The trickiest part is adding retry logic to the calls that fails because an access token has expired. We just need to add code to detect the 401 Unauthorized response, ask for a new token and then retry the call.

Basic Authentication (Before):


########### Apigee.psm1

# bump up TLS to 1.2
[System.Net.ServicePointManager]::SecurityProtocol = 
				[System.Net.SecurityProtocolType]::Tls12 + [System.Net.SecurityProtocolType]::Tls11 + [System.Net.SecurityProtocolType]::Tls;

$global:Apigee = @{}

# get username / password for management API
import-module secretserver
$secret = get-secretserversecret -filter "apigee - admin account"

$global:Apigee.username = $secret.username
$global:Apigee.password = $secret.password

$combo = $global:apigee.username + ":" + $global:apigee.password
$plaintextbytes = [system.text.encoding]::utf8.getbytes($combo)
$base64encoded = [system.convert]::tobase64string($plaintextbytes)
$basicauth = "basic $base64encoded"
$global:apigee.authheader = @{ authorization = $basicauth }

$global:Apigee.ApiUrl = "https://api.enterprise.apigee.com/v1/organizations/"

# grab functions from files (from C:\Chocolatey\chocolateyinstall\helpers\chocolateyInstaller.psm1)
Resolve-Path $root\Apigee.*.ps1 | 
	? { -not ($_.ProviderPath.Contains(".Tests.")) } |
	% { . $_.ProviderPath; }


########### Apigee.Rest.ps1

Function Invoke-ApigeeRest {
[CmdletBinding()]
Param (
	[Parameter(Mandatory = $true)]
	[string] $ApiPath,
	[ValidateSet("Default","Delete","Get","Head","Merge","Options","Patch","Post","Put","Trace")]
	[string] $Method = "Default",
	[object] $Body = $null,
	[string] $ContentType = "application/json",
	[string] $OutFile = $null
)

	if($ApiPath.StartsWith("/") -eq $false) {
		$ApiPath = "/$ApiPath"
	}
	$Uri = $global:Apigee.ApiUrl + $ApiPath
   
	if($Body -eq $null) {
		$result = Invoke-RestMethod `
					-Uri $Uri `
					-Method $Method `
					-Headers $global:Apigee.AuthHeader `
					-ContentType $ContentType `
					-OutFile $OutFile
	} else {
		$result = Invoke-RestMethod `
					-Uri $Uri `
					-Method $Method `
					-Headers $global:Apigee.AuthHeader `
					-Body $Body `
					-ContentType $ContentType `
					-OutFile $OutFile
	}
	
	return $result
}


[string[]]$funcs =
	"Invoke-ApigeeRest"

Export-ModuleMember -Function $funcs

OAuth Authentication (After):

########### Apigee.psm1


# bump up TLS to 1.2
[System.Net.ServicePointManager]::SecurityProtocol = 
				[System.Net.SecurityProtocolType]::Tls12 + [System.Net.SecurityProtocolType]::Tls11 + [System.Net.SecurityProtocolType]::Tls;

$global:Apigee = @{}

# get username / password for management API
import-module secretserver
$secret = get-secretserversecret -filter "apigee - admin account"

$global:Apigee.username = $secret.username
$global:Apigee.password = $secret.password

$global:Apigee.ApiUrl = "https://api.enterprise.apigee.com/v1/organizations/"

# Use OAuth for access credentials. All public info here:
# https://docs.apigee.com/api-platform/system-administration/using-oauth2-security-apigee-edge-management-api
$global:Apigee.OAuthLogin = @{}
$global:Apigee.OAuthLogin.Method = "POST"
$global:Apigee.OAuthLogin.Url = "https://login.apigee.com/oauth/token"
$global:Apigee.OAuthLogin.ContentType = "application/x-www-form-urlencoded"
$global:Apigee.OAuthLogin.Headers = @{
                                                Accept = "application/json;charset=utf-8"
                                                Authorization = "Basic ZWRnZWNsaTplZGdlY2xpc2VjcmV0"
                                            }
$global:Apigee.OAuthLogin.Body = @{
                                                username = $global:Apigee.Username
                                                password = $global:Apigee.Password
                                                grant_type = "password"
                                        }
$global:Apigee.OAuthLogin.ResultObjectName = "ApigeeAccessToken"
# $global:Apigee.OAuthToken set below
# $global:Apigee.AuthHeader set in Apigee.Login.ps1

# grab functions from files (from C:\Chocolatey\chocolateyinstall\helpers\chocolateyInstaller.psm1)
Resolve-Path $root\Apigee.*.ps1 | 
	? { -not ($_.ProviderPath.Contains(".Tests.")) } |
	% { . $_.ProviderPath; }

# get authorization token
$global:Apigee.OAuthToken = Get-ApigeeAccessTokens


########### Apigee.Login.psm1


<#
.SYNOPSIS
	Makes a call to the Apigee OAuth login endpoint and gets access tokens to use.

    This should be used internally by the Apigee module. But, it shouldn't be needed by
    the developer.


.EXAMPLE
	$result = Get-ApigeeAccessTokens
#>
Function Get-ApigeeAccessTokens {
[CmdletBinding()]
[OutputType([PSCustomObject])]
Param ()

    $results =	Invoke-WebRequest `
                    -Uri $global:Apigee.OAuthLogin.Url `
                    -Method $global:Apigee.OAuthLogin.Method `
                    -Headers $global:Apigee.OAuthLogin.Headers `
                    -ContentType $global:Apigee.OAuthLogin.ContentType `
                    -Body $global:Apigee.OAuthLogin.Body

    if($results.StatusCode -ne 200) {
        $resultsAsString = $results | Out-String
        throw "Authentication with Apigee's OAuth Failed. `r`n`r`nFull Response Object:`r`n$resultsAsString"
    }
    
    $resultsObj = ConvertFrom-Json -InputObject $results.Content
    $resultsObj = Add-PsType -PSObject $resultsObj -PsType $global:Apigee.OAuthLogin.ResultObjectName

    Set-ApigeeAuthHeader -Authorization $resultsObj.access_token

    return $resultsObj
}

<#
.SYNOPSIS
	Sets $global:Apigee.AuthHeader @{ Authorization = "value passed in" }

    This is used to authenticate all calls to the Apigee REST Management endpoints.

.EXAMPLE
	Set-ApigeeAuthHeader -Authorization "Bearer ..."
#>
Function Set-ApigeeAuthHeader {
[CmdletBinding()]
[OutputType([PSCustomObject])]
Param (
    [Parameter(Mandatory = $true)]
    $Authorization
)

    $bearerAuth = "Bearer $Authorization"
	$global:Apigee.AuthHeader = @{ Authorization = $bearerAuth }
}


[string[]]$funcs =
	"Get-ApigeeAccessTokens", "Set-ApigeeAuthHeader"

Export-ModuleMember -Function $funcs


########### Apigee.Rest.psm1


Function Invoke-ApigeeRest {
[CmdletBinding()]
Param (
	[Parameter(Mandatory = $true)]
	[string] $ApiPath,
	[ValidateSet("Default","Delete","Get","Head","Merge","Options","Patch","Post","Put","Trace")]
	[string] $Method = "Default",
	[object] $Body = $null,
	[string] $ContentType = "application/json",
	[string] $OutFile = $null
)

	if($ApiPath.StartsWith("/") -eq $false) {
		$ApiPath = "/$ApiPath"
	}
	$Uri = $global:Apigee.ApiUrl + $ApiPath

    $attempt = 1
    $retry = $false
        
    do {
        $retry = $false

        try {

	        if($Body -eq $null) {
		        $result = Invoke-RestMethod `
					        -Uri $Uri `
					        -Method $Method `
					        -Headers $global:Apigee.AuthHeader `
					        -ContentType $ContentType `
					        -OutFile $OutFile
	        } else {
		        $result = Invoke-RestMethod `
					        -Uri $Uri `
					        -Method $Method `
					        -Headers $global:Apigee.AuthHeader `
					        -Body $Body `
					        -ContentType $ContentType `
					        -OutFile $OutFile
	        }

        } catch {

            # if the request is unauthorized, get a new access tokens & retry
            $isWebException = (Get-PsType -PSObject $_.Exception) -eq "System.Net.WebException"
            $is401Unauthorized = $_.Exception.Message -eq "The remote server returned an error: (401) Unauthorized."
            
            if($isWebException -and $is401Unauthorized) {
                Get-ApigeeAccessTokens
                
                if($attempt -lt 2) {
                    $retry = $true
                }
            } else {

                throw    # unexpected exception, so rethrow

            }
        }

        $attempt++

    } while( $retry )
	
	return $result
}


[string[]]$funcs =
	"Invoke-ApigeeRest"

Export-ModuleMember -Function $funcs

Approve/Revoke API Keys in Apigee Through PS

on Monday, April 2, 2018

The Apigee API Gateway grants access using API Keys (in this example). And, those keys are provisioned for each application that will use an API. This can be a bit confusing, because when you first sign up to use an API, you think that you’re going to get an API Key. But, that’s not the case. It’s your application that gets the key. This grants finer grained control of what applications have access to what, and allows for malicious activity to have a narrower impact. It does make the REST API Management backend a little confusing, as you always need to specify a developers email address when updating an application. The application’s are owned by a developer, so you have to know the developer before updating the application.

There’s a little more confusion because Applications don’t have direct access to APIs. Applications are given approval to use API Products. And, those API Products grant access to different API Proxies. This layer of abstraction is helpful when you want to make a very custom made API Product for an individual customer. And that can happen more often than you might expect.

image

So, in order to approve or revoke an API key on an Application you will actually need:

  • The developers email address
  • The application name
  • The API product name
  • And, either to approve or revoke the status

This script will use the developer email address and application name to look up the status of the application. If no specific API product name is given then the status of Approve or Revoke will be applied to the Application and all associated API Products. If a specific API product name is given, then only that API Products' status will be updated.

$global:ApigeeModule = @{}
$global:ApigeeModule.ApiUrl = "https://api.enterprise.apigee.com/v1/organizations/{org-name}"
$global:ApigeeModule.AuthHeader = @{ Authorization = "Basic {base64-encoded-credentials}" }

<#
.SYNOPSIS
	Makes a call to the Apigee Management API. It sets the approved/revoked status on
    an individual API Product for an Appliation. If not individual API Product is specified
    then the status will change for the Application and all associated API Products.

.PARAMETER Email
	The developer email address that owns the Application

.PARAMETER AppName
    The application to updated

.PARAMETER ApiProductName
    The individual API product to update (optional).

.PARAMETER Status
    Either 'approved' or 'revoked'

.EXAMPLE
	$appInfo = Set-ApigeeDeveloperAppStatus -Email it@company.org -AppName someapp -ApiProductName calendard_api -Status approved
#>
Function Set-ApigeeDeveloperAppStatus {
[CmdletBinding()]
Param (
    [Parameter(Mandatory = $true)]
    [string] $Email,
    [Parameter(Mandatory = $true)]
    [string] $AppName,
    [Parameter(Mandatory = $false)]
    [string] $ApiProductName = [String]::Empty,
    [Parameter(Mandatory = $true)]
    [ValidateSet("approved","revoked")]
    [string] $Status
)

    $action = "approve"
    if($Status -eq "revoked") { $action = "revoke" }


    # check the app exists (maybe use error handling here?)
    $appPath = "/developers/$Email/apps/$AppName"
    $app = Invoke-ApigeeRest -ApiPath $appPath


    # api key/oauth key are stored in the first credentials
    # (all api products are stored within this credential)
    $creds = $app.credentials[0]

    $keysPath = "$appPath/keys"
    $keyPath = "$keysPath/$($creds.consumerKey)"


    # if no api product is selected, approve or deny the entire developer app
    # (the api products are going to be approved/revoked as well)
    if($ApiProductName -eq [String]::Empty) {

        # it's very rare that the App will have it's status changed, but just in case ...
        if($app.status -ne $Status) { 
            $path = $appPath + "?action=$action"
            Write-Verbose "Setting app '$AppName' ($Email) to status '$Status'"
            Invoke-ApigeeRest -ApiPath $path -Method Post -ContentType "application/octet-stream"
        }
    

        # if no api product is selected,
        # then approve or deny the entire set of api products
        foreach($apiProduct in $creds.apiProducts) {
            if($apiProduct.status -ne $Status) {
                $path ="$keyPath/apiproducts/$($apiproduct.apiproduct)?action=$action"
                Write-Verbose "Setting api product '$($apiproduct.apiproduct)' on app '$AppName' ($Email) to status '$Status'"
                Invoke-ApigeeRest -ApiPath $path -Method Post -ContentType "application/octet-stream"
            }
        }

    } else {
    # if an api product name is given, then only update that product

        # check the api product exists
        $apiProduct = $creds.apiProducts |? apiproduct -eq $ApiProductName
        if(-not $apiProduct) {

            Write-Verbose "Could not find api product '$ApiProductName' for app '$AppName' ($Email)"

        } else {
            
            $path = "$keyPath/apiproducts/$($ApiProductName)?action=$action"
            Write-Verbose "Setting api product '$ApiProductName' on app '$AppName' ($Email) to status '$Status'"
            Invoke-ApigeeRest -ApiPath $path -Method Post -ContentType "application/octet-stream"

        }
    }
    

    $app = Invoke-ApigeeRest -ApiPath $appPath
    return $app
}


<#
.SYNOPSIS
	Makes a call to the Apigee Management API. It adds the authorization header and
	uses the root url for our organizations management api endpoint ($global:ApigeeModule.ApiUrl).
	This returns the body of the response as a string.

.PARAMETER ApiPath
	The sub path that will be added onto $global:ApigeeModule.ApiUrl.

.EXAMPLE
	$developers = Invoke-ApigeeMethod -ApiPath "/developers"
#>
Function Invoke-ApigeeRest {
[CmdletBinding()]
Param (
	[Parameter(Mandatory = $true)]
	[string] $ApiPath,
	[ValidateSet("Default","Delete","Get","Head","Merge","Options","Patch","Post","Put","Trace")]
	[string] $Method = "Default",
	[object] $Body = $null,
	[string] $ContentType = "application/json",
    [string] $OutFile = $null
)

	if($ApiPath.StartsWith("/") -eq $false) {
		$ApiPath = "/$ApiPath"
	}
	$Uri = $global:ApigeeModule.ApiUrl + $ApiPath

	if($Body -eq $null) {
		$result = Invoke-RestMethod `
                    -Uri $Uri `
                    -Method $Method `
                    -Headers $global:ApigeeModule.AuthHeader `
                    -ContentType $ContentType `
                    -OutFile $OutFile
	} else {
		$result = Invoke-RestMethod `
                    -Uri $Uri `
                    -Method $Method `
                    -Headers $global:ApigeeModule.AuthHeader `
                    -Body $Body `
                    -ContentType $ContentType `
                    -OutFile $OutFile
	}
	
	return $result
}

Apigee Response CORS Headers using Javascript

on Monday, February 26, 2018

Apigee provides a quick “Add CORS Headers” to responses when creating a new API Proxy. It’s straight forward and will get you started to add CORS headers to the replies from your first API endpoints. The problem with that is that CORS headers are used in “preflight” and aren’t that useful after the call has successfully completed. Apigee OPTIONS Response for Preflight/CORS can help you set up preflight responses.

But, it’s still useful to add in CORS headers to your responses in order to ensure that your endpoints are communicating their security requirements. To do this you can use javascript to inspect the responses and add in missing CORS headers. This sample javascript will:

  • Ensure Access-Control-Allow-Origin is defined. Sets the default value to ‘*’.
  • Ensure Access-Control-Allow-Headers is defined. Sets the default value to ‘origin, x-requested-with, accept, my-api-key, my-api-version, authorization, content-type’.
    • my-api-key and my-api-version are custom headers specific to the Apigee endpoints this script is used with. If the Resource Service doesn’t return these headers, then they will be added in.
  • Ensure Access-Control-Max-Age is defined. Sets the default value to ‘3628800’ seconds (42 days … I have no idea why that was chosen.)
  • Ensure Access-Control-Allow-Methods is defined. Sets the default value to ‘GET, PUT, POST, DELETE’. This should really be set by the Resource Service, so use it only if you feel comfortable.

This should be created as a Shared Flow and applied to Proxy Endpoint's Postflow.

//  Access-Control-Allow-Origin
var accessControlAllowOrigin = context.getVariable("response.header.Access-Control-Allow-Origin.values").toString();
if(accessControlAllowOrigin.startsWith('[')) { accessControlAllowOrigin = accessControlAllowOrigin.substring(1, accessControlAllowOrigin.length() - 1); }
if(accessControlAllowOrigin.endsWith('[')) { accessControlAllowOrigin = accessControlAllowOrigin.substring(0, accessControlAllowOrigin.length() - 1); }
if(accessControlAllowOrigin.length() === 0) {
    accessControlAllowOrigin = "*";
}
context.setVariable("response.header.Access-Control-Allow-Origin", accessControlAllowOrigin);

//  Access-Control-Allow-Headers
var accessControlAllowHeaders = context.getVariable("response.header.Access-Control-Allow-Headers.values").toString();
if(accessControlAllowHeaders.startsWith('[')) { accessControlAllowHeaders = accessControlAllowHeaders.substring(1, accessControlAllowHeaders.length() - 1); }
if(accessControlAllowHeaders.endsWith('[')) { accessControlAllowHeaders = accessControlAllowHeaders.substring(0, accessControlAllowHeaders.length() - 1); }
if(accessControlAllowHeaders.length() === 0) {
    accessControlAllowHeaders = "origin, x-requested-with, accept, my-api-key, my-api-version, authorization, content-type";
}
if(accessControlAllowHeaders.indexOf("my-api-key") === -1) {
    accessControlAllowHeaders += ", my-api-key";
}
if(accessControlAllowHeaders.indexOf("my-api-version") === -1) {
    accessControlAllowHeaders += ", my-api-version";
}
context.setVariable("response.header.Access-Control-Allow-Headers", accessControlAllowHeaders);

//  Access-Control-Max-Age
var accessControlMaxAge = context.getVariable("response.header.Access-Control-Max-Age.values").toString();
if(accessControlMaxAge.startsWith('[')) { accessControlMaxAge = accessControlMaxAge.substring(1, accessControlMaxAge.length() - 1); }
if(accessControlMaxAge.endsWith('[')) { accessControlMaxAge = accessControlMaxAge.substring(0, accessControlMaxAge.length() - 1); }
if(accessControlMaxAge.length() === 0) {
    accessControlMaxAge = "3628800";
}
context.setVariable("response.header.Access-Control-Max-Age", accessControlMaxAge);

//  Access-Control-Allow-Methods
var accessControlAllowMethods = context.getVariable("response.header.Access-Control-Allow-Methods.values").toString();
if(accessControlAllowMethods.startsWith('[')) { accessControlAllowMethods = accessControlAllowMethods.substring(1, accessControlAllowMethods.length() - 1); }
if(accessControlAllowMethods.endsWith('[')) { accessControlAllowMethods = accessControlAllowMethods.substring(0, accessControlAllowMethods.length() - 1); }
if(accessControlAllowMethods.length() === 0) {
    accessControlAllowMethods = "GET, PUT, POST, DELETE";
}
context.setVariable("response.header.Access-Control-Allow-Methods", accessControlAllowMethods);

Apigee Key Value Maps (KVM) To Store Passwords

on Monday, February 19, 2018

Cloud based computing has broken some of the molds of traditional security models. Things like IP whitelisting on a firewall sometimes aren’t even an option. And, because of that, some older techniques are back and can really work wonders for simple authentication security.

A quick note: Apigee’s Business option (and above) actually comes with static IP addresses, so this technique can be used in conjunction with IP whitelisting.

Apigee is an API Management system, so it has the capability to handle many authentication protocols for clients to connect to it’s cloud based endpoints. But, we’re gonna look at the other half to the communication path. We’re gonna look at when the API Gateway has to call down to the resource service. And, this is a technique to inform the resource server that it is the API Gateway which is making the call to it.

The technique is Basic Authentication. It’s been around for a long time and it’s basically a magic string you put in the header of your requests. Your resource service will inspect the header and make sure it’s talking to a client that knows the shared secret. Since this is a shared secret we need a way to store the secret in Apigee that’s secure. And, it’s pretty darn secure.

Put the Shared Secret in the KVM

Basic Authentication is a username and password joined together by a colon and then base 64 encoded. The header looks like this:

Authorization:    Basic   {base64encoded(“username:password”)}

So, we’re going to store both the username and password into Apigee’s KVM. The first thing we need to do is select the KVM level we want to store it at.

  • Organization Level
    • If you’re going to reuse the same username/password on multiple APIs in multiple environments, then this works well.
  • Environment Level
    • If you’re going to reuse the same username/password on multiple APIs, but you want to use a different secret between Prod and everything else.
  • API Proxy Level
    • If you’re looking for a secret defined to a single API Proxy, but used in all environments.

In this example, were going to do an API Proxy Level KVM.

$adminUser = "tom@place.com"   # apigee.com/edge username
$adminPass = "tommyspass"      # apigee.com/edge password
$org = "org1"                  # apigee.com/edge organization
$apiName = "my-api"            # an api proxy name

# bump up TLS to 1.2 (.NET defaults to SSL3, which isn't supported on Apigee management endpoints)
[System.Net.ServicePointManager]::SecurityProtocol = 
				[System.Net.SecurityProtocolType]::Tls12 + [System.Net.SecurityProtocolType]::Tls11 + [System.Net.SecurityProtocolType]::Tls;

# this isn't the KVM, this is Apigee security
$bytes = [System.Text.Encoding]::ASCII.GetBytes($adminUser + ":" + $adminPass)
$encodedText = [Convert]::ToBase64String($bytes)
$adminHeader = @{ Authorization = "Basic $encodedText"; "Content-Type" = "application/json" }

$rootUrl = "https://api.enterprise.apigee.com/v1/organizations/$org"
$apikvmUrl = "$rootUrl/apis/$apiName/keyvaluemaps"

$kvms = Invoke-RestMethod -Method GET -Uri $apikvmUrl -Headers $adminHeader
# currently $kvms is most likely empty

# so, let's add one
$kvmName = "my-customKVM"
$kvmEntry = @{
    name = $kvmName
    encrypted = "true"    # this is important and will come back later
    entry = @(
        @{ name = "username"; value = "sooo" },
        @{ name = "password"; value = "secret" }
    )
}
$json = ConvertTo-Json $kvmEntry

$newKvm = Invoke-RestMethod -Method POST -Uri $apikvmUrl -Headers $adminHeader -Body $json
$newKvm | fl
# this is the last time you can see the unencrypted secret values
# make sure to store the values in a password safe before clearing these values

$kvms = Invoke-RestMethod -Method GET -Uri $apikvmUrl -Headers $adminHeader
$kvms # $kvms should now list "new-customKVM"

$apiKvmEntryUrl = "$apikvmUrl/$kvmName"
$kvm = Invoke-RestMethod -Method GET -Uri $apiKvmEntryUrl -Headers $adminHeader
$kvm | fl
# this time the values are hidden (******)

## And, of course the delete
#Invoke-RestMethod -Method Delete -Uri $apiKvmEntryUrl -Headers $adminHeader

image

Retrieve the Shared Secret from the KVM

Now we have my-customKVM setup at the API Proxy level. So, let’s use the value in the flow to create a Basic Authorization header and populate the value. To do this, we are going to use the KeyValueMapOperations Policy to retrieve the credentials. In this policy, it’s very important to store the credentials to a variable that starts with private.. The KVM entry that we made was encrypted. And, you can only read an encrypted KVM value into a variable that is scoped to private.. The reason for this is security. private. variables will never appear in the Trace tool, nor will they be logged. However, you can look at them by using javascript callouts (this is important for debugging).

You can only read an encrypted KVM value into a variable that is scoped to private.

<?xml version="1.0" encoding="UTF-8" standalone="yes"?>
<KeyValueMapOperations async="false" continueOnError="false" enabled="true" name="Retrieve-Credentials" mapIdentifier="my-customKVM">
    <DisplayName>Retrieve Credentials</DisplayName>
    <Properties/>
    <ExclusiveCache>false</ExclusiveCache>
    <ExpiryTimeInSecs>300</ExpiryTimeInSecs>
    <Scope>apiproxy</Scope>
    <Get assignTo="private.ba.username" index="1">
        <Key>
            <Parameter>username</Parameter>
        </Key>
    </Get>
    <Get assignTo="private.ba.password" index="1">
        <Key>
            <Parameter>password</Parameter>
        </Key>
    </Get>
</KeyValueMapOperations>

And, Assign the Header to the Request

So, we’ve now loaded the username and password from the KVM into private.ba.username and private.ba.password. We are now going to use the BasicAuthentication Policy to set the Authorization header.

<?xml version="1.0" encoding="UTF-8" standalone="yes"?>
<BasicAuthentication async="false" continueOnError="false" enabled="true" name="Add-BasicAuth-Header">
    <DisplayName>Add BasicAuth Header</DisplayName>
    <Operation>Encode</Operation>
    <IgnoreUnresolvedVariables>false</IgnoreUnresolvedVariables>
    <User ref="private.ba.username"/>
    <Password ref="private.ba.password"/>
    <AssignTo createNew="false">request.header.Authorization</AssignTo>
</BasicAuthentication>

Troubleshooting private. variables

When working with private. variables, it’s very useful to use Javascript policies to inspect the value of the variables (because they don’t appear in the Trace tool).

print(context.getVariable("private.ba.username"))
print(context.getVariable("private.ba.password"))

Alter PathSuffix in Apigee with/out Load Balancer

on Friday, February 16, 2018

Apigee’s API Gateway is by many measures a proxy server with some really nice bells and whistles attached. But, it’s still a proxy server at it’s core. Which means it should be able to transform an incoming request before it’s sent to the backend/target resource servers. It can do that, but it’s not as easy as you might hope.

With an API Gateway, a common trasnformation would be to remove a version number from a url before sending the request to the backend server. This scenario crops up when the developer of the resource API didn’t design their system with version numbers in mind. The scenario looks like this:

image

So, in this scenario, the Body API Proxy has a BasePath of /body (proxy.basepath). And the PathSuffix would be /v1/wheels?drive=4WD (proxy.pathsuffix). The developer of the resource service didn’t have version built into the url path, and is expecting a url without it.

Without a Load Balancer Configuration

To make this transformation, we are going to need to artificial create the target endpoints url during the flow process. Seeing that the API Gateway is a proxy server, you would think that you would just need overwrite the request or proxy variables, but most of those are actually read only. Here’s what you’ll need to do:

  1. You’ll use the request.uri and proxy.basepath to figure out the full path suffix.
  2. If the path contains a version number (/v1/) then you will …
  3. Set target.copy.pathsuffix to false. (At the moment, you have to use a Javascript Callout. There is a bug with using an AssignMessage Policy).
    1. This must occur in the Target Endpoint flows (most likely the PreFlow). You can’t do this in the Proxy Endpoint, because the target variables haven’t been created yet. So, they aren’t “in scope”.
  4. You’ll then remove the version number (/v1/) to get the “new” path suffix.
  5. And, finally, you will set the target.url to constructed path. (target.url is one of the few read/write variables.)

Target Endpoint with No Load Balancer

image

With a Load Balancer Configuration

Apigee uses a Load Balancer variable in the Target Endpoint configuration to allow for Resource Server DNS hostnames to be dynamic between the environments. Unfortunately, when this is used, the target.url variable is no longer used. And, you need to set target.copy.queryparams to false as well.

To this, you’ll follow the same steps above, but this time you’ll …

  1. And, finally, you will set the target.url to constructed path. (target.url is one of the few read/write variables.)
  2. Set target.copy.queryparams to false.
  3. Set the {newpathsuffix} variable, which will be configured on the Target Endpoint’s Path.

Target Endpoint with Load Balancer

image

Javascript Callout for Target Endpoint PreFlow: (note that variable {newpathsuffix} isn’t needed when no Load Balancer is involved. It’s being used to make both implementations look similar.)

//  parses the original request to remove the version piece ("/v1", etc)
var basepath = context.getVariable("proxy.basepath")
print("basepath: " + basepath);
var uri = context.getVariable("request.uri");
print("uri: " + uri);
var pathsuffix = uri.substring(basepath.length)
var regex = /(.*)\/v[0-9]+\/(.*)/
var found = regex.exec(pathsuffix)
print("found: " + found)
if(found !== null) {
    //  prevents the request to the backend server from using the original "request.pathSuffix"
    //  this is very important!
    //  the original "request.path" will overwrite whatever we do here if this isn't set
    context.setVariable("target.copy.pathsuffix", false)
    
    // remove the "/v1" part
    var newPathSuffix = found[1]
    if(newPathSuffix.length > 0) { newPathSuffix += "/" }
    newPathSuffix += found[2]
    
    print("newPathSuffix: " + newPathSuffix)
    context.setVariable("newpathsuffix", newPathSuffix)
    
    var targetUrl = context.getVariable("target.url")
    print("target url: " + targetUrl)
    if(targetUrl !== null) {
        
        var pathSuffixRegex = /(.*){newpathsuffix}(.*)/
        var pathSuffixFound = pathSuffixRegex.exec(targetUrl)
        print("pathSuffixFound: " + pathSuffixFound)
        
        if(pathSuffixFound !== null) {
            
            var newUrl = pathSuffixFound[1] + newPathSuffix + pathSuffixFound[2]
            print("new url (replace): " + newUrl)
            context.setVariable("target.url", newUrl);
            
        } else {
            var newUrl = targetUrl + newPathSuffix
            print("new url (append): " + newUrl)
            context.setVariable("target.url", newUrl);
            
        }
    } else {
        // using load balancer
        context.setVariable("target.copy.queryparams", "false") // needed on load balancer
        // the load balancer can use the variable substitution on the  innerText
    }
} else {
    print("newpathsuffix: [empty string]")
    context.setVariable("newpathsuffix", "")
}

target.copy.pathsuffix and target.copy.queryparams

So, these are the key variables that make overwriting the target path possible. The creation of these variables probably has good reasoning behind it, but from an outside perspective they seem really odd. Apigee’s internal system allows you to do a variety of alterations and checks through the Proxy and Target Endpoint flows. These flows can alter most things within the system at the time they execute within the pipeline. BUT, the proxy.pathsuffix and proxy.queryparams are (a) readonly and (b) will overwrite any changes you make to the target.url value. They just ignore everything that happened in the pipeline and override it. This behavior seems to conflict with the way the “flow” system was designed.

Apigee OPTIONS Response for Preflight/CORS

on Monday, February 12, 2018

Apigee comes with the ability to add CORS headers to responses right out of the box. This really isn't that useful though. And, it instills a false sense that it’s actually providing valuable CORS information so the developer doesn't have to think about it.

image

CORS is really implemented into browsers to prevent requests from going to unauthorized endpoints. To do this, many browsers (like Chrome) use a “Preflight” request to pull back a couple of headers which let the browser know that a web service does allow requests from other “origins” (or, DNS names). Essentially CORS headers state:

These websites can use this web service. And, this web service allows these methods (GET, POST, etc) to be called from that website for the resource in question. (With web services, a lot of the time, “These websites” is actually “All websites.”)

Back to Apigee’s initial setup: The problem with adding CORS headers on all responses is that the Preflight request isn’t going to match one of the normal endpoints on an API. So, the response will most likely be a 404 Not Found. And, browsers will consider that an error, and they won’t allow the real request to go through.

This is a big deal for https://editor.swagger.io/. The basic Swagger UI Tester uses fetch, which does the Preflight request/check. The swagger editor and tester are used all over the place and most browsers will try to do a Preflight check which will result in this error message (the image is from Chromes developer tools):

image

In Chrome’s Network tab it will look like this:

image

Take note that the Preflight request is asking the server not only if it’s okay if http://editor.swagger.io is calling, but it wants to know if the ‘ucsb-api-version’ header is acceptable. This means the preflight request doesn’t actually send across any security information. It’s asking if it’s okay to send across security information.

So, if you want to have an Apigee web service that is compatible with the standard Swagger UI editor and tester you need to watch for the OPTIONS preflight request and return an acceptable response. Luckily, this can be done by taking the original CORS headers response and turning it into a PreFlow response. Start out by creating a Shared Flow that looks for OPTIONS requests:

<?xml version="1.0" encoding="UTF-8" standalone="yes"?>
<SharedFlow name="default">
    <Step>
        <Name>OPTIONS-CORS-Headers-Response</Name>
        <Condition>request.verb = "OPTIONS"</Condition>
    </Step>
</SharedFlow>

Then add a RaiseFault Policy that will return all the CORS headers and successful status code:

<?xml version="1.0" encoding="UTF-8" standalone="yes"?>
<RaiseFault async="false" continueOnError="false" enabled="true" name="OPTIONS-CORS-Headers-Response">
    <DisplayName>OPTIONS CORS Headers Response</DisplayName>
    <Properties/>
    <FaultResponse>
        <Set>
            <Headers>
                <Header name="Access-Control-Allow-Origin">*</Header>
                <Header name="Access-Control-Allow-Headers">origin, x-requested-with, accept, ucsb-api-key, ucsb-api-version, authorization</Header>
                <Header name="Access-Control-Max-Age">3628800</Header>
                <Header name="Access-Control-Allow-Methods">GET, PUT, POST, DELETE</Header>
            </Headers>
            <Payload contentType="text/plain"/>
            <StatusCode>200</StatusCode>
            <ReasonPhrase>OK</ReasonPhrase>
        </Set>
    </FaultResponse>
    <IgnoreUnresolvedVariables>true</IgnoreUnresolvedVariables>
</RaiseFault>

Now, all you need to do is add the Shared Flow as the very first Step in your API Proxies’ Preflow Proxy Endpoint steps. The Shared Flow step must come before the API Key verification step because the OPTIONS request will not contain security authorization information. It should look something like this:

image

Once this is all setup, preflight requests from https://editor.swagger.io/ will pass without error. And now you should get a successful response:

image

But, this isn’t a perfect solution. There are still faults with it because your API Proxy is now blindly stating that it will take requests from almost anywhere and for a variety of different METHOD types.

The best possible solution would be to allow for OPTIONS Preflight requests to be detected by looking for the OPTIONS method and checking if the 3 required headers exist. If all of those conditions are met, then flow the request down to the resource server and let it determine what the exact CORS response it can serve. But, that’s all configuration for another day.

Apigee’s security is NOT Default Deny

on Friday, February 9, 2018

Apigee makes a great API Gateway product. But, one thing that’s been surprising is that the security system is not Deny Access by Default. It’s a very forward thinking design, but it surprised many of us who assumed the common security practice of Default Deny was the starting point.

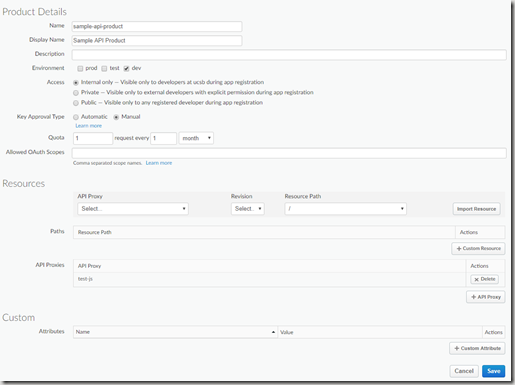
For an application to have access to an API, the application must first be approved to use an API Product. The piece that’s surprising is that if an API Product has no API Proxies or Resource Path restrictions applied to it, then it gives full access to all API Proxies.

Don’t do this. Always attach at least one API Proxy to your API Products.

image

Once you have an API Product setup with an API Proxy, you have restricted access to just that API Proxy’s endpoint. Which is a good step forward. But, it gives you access to the entire endpoint, with no filtering on the “known paths”.

Beware of not applying resource path restrictions. Without resource restrictions, everything going through your API Proxy’s endpoint is passed through.

image

For example, if an API Proxy has a base path of:

https://{org}-{env}.apigee.net/firstapiproxy

And, that API Proxy has “known paths” (eg. flows) of

  • GET /cars
  • GET /trucks
  • GET /vans

Because there are no resource path restrictions, these urls will also work:

To apply the Resource Path restrictions use the API Product interface:

image

Or, for even stricter security, create a DefaultNotFound Flow within your API Proxy. Like the Send404NotFoundResponse used in the oauth2/proxy example:

image

Apigee OAuth Tester in Powershell

on Monday, February 5, 2018

New Apigee instances/organizations come with a built in OAuth 2.0 server. Their default security mechanism is an API Key, but they fully support OAuth 2.0 right out of the box.

A new instance will come with an active OAuth 2.0 endpoint deployed to your Dev, Test, and Prod instances.

The default OAuth 2.0 endpoint is very similar to this proxy example. But, the tutorial on Apigee’s website is to send the grant_type as a form parameter. So, a quick swap can change the grant_type lookup:

image_thumb[3]

Once that’s changed over, you’ll need to request an access token from the endpoint. To do this go into one of your applications and get the client_id and client_secret:

image_thumb[7]

And now we can throw this info into a powershell script to get back our bearer token:

$apigeeHost = "{organization}-{environment}.apigee.net"
$clientId = "{your client id}"
$clientSecret = "{your client secret}"

$authUrl = "https://$apigeeHost/oauth/client_credential/accesstoken"
$authHeaders = @{
    "Content-Type" = "application/x-www-form-urlencoded"
}
$authBody = "grant_type=client_credentials" + `
            "&client_id=$clientId" + `
            "&client_secret=$clientSecret"

$authResponse = Invoke-WebRequest -Method POST -Headers $headers -Body $body -Uri $loginUrl

if($response.StatusCode -ne 200) {
    throw ("Authorization Failure`r`n" + $response)
}

$authInfo = ConvertFrom-Json $response.Content

$authInfo

image_thumb[9]

Before making a call to a resource, make sure to setup the resource API Proxy with an OAuth Verification:

image_thumb[15]

image_thumb[17]

You actually only need the <Operation>VerifyAccessToken</Operation>, but it doesn’t hurt to leave the rest.

Now that we have a bearer token, we can use it as an authorization header to make a call to our resource:

# use your resource url here
$resourceUrl = "https://$apigeeHost/sa/quartercalendar/oauth/v1/quarters?quarter=20154"
$resourceHeaders = @{
    Authorization = "Bearer $($authInfo.access_token)"
}
$resourceResponse = Invoke-WebRequest -Method GET -Uri $resourceUrl -Headers $resourceHeaders
ConvertFrom-Json $resourceResponse.Content

image_thumb[13]


Creative Commons License
This site uses Alex Gorbatchev's SyntaxHighlighter, and hosted by herdingcode.com's Jon Galloway.